Getting Started
This page serves as a quick guide to help you begin working with the XEF API. It covers everything you need to start the integration process—from setting up an API user to sending your initial requests.
The XEF API is a RESTful API, which uses standard HTTP methods and status codes, and exchanges data in JSON format.
This guide outlines the key steps to help you begin integrating the Revo XEF API with your application. Our API offers a robust and adaptable interface to handle tasks such as managing the catalog, the customers, creating orders, getting sales, and more.
Whether you're an experienced developer or new to APIs, this guide will give you the core knowledge required to integrate Revo XEF resources into your solution.
Requesting API Access
When requesting access, please specify whether your integration is:
If the integration is public, you must also provide the Redirect URI that your application will use during the OAuth 2.0 authentication flow, otherwise we cannot provide you the Client ID.
Each type may follow a slightly different onboarding and review process.
When requesting access, please specify whether your integration is public or private.
To begin the integration process, please submit your access request using the following form:
Once your request is approved, we will contact you by sending the corresponding credentials along with access to a dedicated test environment account.
Public Integration Authentication (OAuth 2.0 Authorization Code Grant with PKCE)
The XEF API uses the OAuth 2.0 Authorization Code Grant with PKCE (Proof Key for Code Exchange) as its standard authentication flow. This provides secure, delegated access for third-party applications and client-side integrations, while eliminating the need to store client secrets in public or mobile environments.
How OAuth 2.0 with PKCE Works
To authenticate with the XEF API:
- The client application initiates the OAuth 2.0 Authorization Code Grant flow, including a code challenge (PKCE).
- The user is redirected to the authorization server to log in and approve access.
- Once authorized, the user is redirected back to the application's Redirect URI, along with an authorization code.
- The client exchanges this code (along with the code verifier) for an access token.
- The access token is then used to make authorized requests to the XEF API.
PKCE (Proof Key for Code Exchange) protects public clients (like browser-based or mobile apps) from certain attack vectors by eliminating the need for a client secret.
Additional Resources
For more detailed technical information about the standard OAuth 2.0 Authorization Code Grant Clients flow with PKCE, refer to these external guides:
- OAuth 2.0 with PKCE - Auth0 Documentation
- Proof Key for Code Exchange (PKCE) - oauth.net
- OAuth 2.0 Overview and Concepts - oauth.net
Required Parameters
During this flow, your application must provide:
This is the HTTPS endpoint your application uses to receive the authorization code.
Example: https://yourapplication.com/oauth/callback
Scopes determine what parts of the API your application is allowed to access. You must request the appropriate scopes during the authorization step.
The required scope(s) are documented per endpoint in the API specification.
Expiration Time
The access token generated will expire in 30 days.
The refresh token will expire in 365 days.
Make sure you manage the access token renewal before it expires.
Private Integration Authentication (Personal Token)
In scenarios where OAuth 2.0 is not necessary or suitable—such as internal services or client-specific back-end integrations—you can authenticate using a Personal Token.
This approach allows secure, direct access to the API using a manually generated token.
Generating a Personal Token
The Personal Token is created using the Revo XEF Back-office interface . To obtain a Personal Token, the following information must be provided to the customer reseller (production environment) or to the REVO Integrations Tech Lead (test environment):
You must specify which scopes (permissions) the token should have. These scopes define the operations and resources your integration will be allowed to access.
You can update the scopes and expiration of the token after creation, if needed.
You are required to define a token lifespan at the time of creation. The following expiration options are available:
- 1 day
- 1 week
- 1 month
- 2 months
- 3 months
- 1 year
- 3 years
This determines how long the token will remain valid before manual renewal is required.
Token Visibility
Once the token is created, it will be displayed only once. Please ensure that you copy and store it securely at that moment. You will not be able to retrieve the token again after that point.
If the token is lost, must be removed and a new one must be created.
Token Renewal
Personal Tokens do not auto-renew. When a token approaches its expiration, you must manually generate a new one and update your integration accordingly.
For the moment, we recommend setting up internal alerts to track expiration dates and ensure uninterrupted access. (i) is planned for the future to notify clearly the expiration approach in the Back-office
Making Requests
Base URLs
- INTEGRATIONS: https://api.integrations.revoxef.works
- PRODUCTION: https://api.revoxef.works
Required Headers
All API requests must include the following header:
If this header is missing, the server will reject the request or respond with an error. This ensures that the client explicitly expects a JSON response, which is the standard format for all API interactions.
Request Rate Limits
The entire API is subject to a rate limit of 120 requests per minute or 1800 requests per hour, applied per IP address and tenant/account.
Request Size Limits
All API requests must follow a defined structure, and each field has specific rules and constraints, which are detailed in the API specification.
Idempotency in POST Requests
To ensure safe retries and prevent duplicate resource creation, POST requests should include an Idempotency-Key header.
This header must contain a unique value (e.g., a UUID) that the client generates. If the same key is used in a repeated request, the server will return the result of the original operation instead of creating a new resource.
This mechanism is especially important for network retries and client-side timeout recovery.
Query Parameters for Extended Data
Many endpoints in the XEF API support query parameters that allow you to include additional related data in the response. This is useful when you need more context or associated resources in a single request.
For example, the query param "complete" shows all the possible response fields, as it is reduced by default.
Check each endpoint's documentation to see which include options are supported and only use them when it's needed.
Working with Resources
Pagination
All requests in this API are handled using a pagination system in the response. By default, the pagination limit is set to 200 items per response.
To modify the pagination limit, you can use the query parameter “limit=n”, as detailed in the API specification.
Multiple Actions
For batch operations (referred to as MULTIPLE Actions), there is a limit of 250 resource objects per request. These operations allow you to create, update, or delete multiple resources in a single call.
The request is processed asynchronously via a background job. The job remains active for 60 minutes after its creation. After this period, its status can no longer be retrieved.
You can monitor the status of the job using the following endpoint:
Image Resources
For resources that involve image uploads, the specific size and format limitations are also described in the API specification.
Multi-Tenant Architecture: Master and Tenant
The XEF API supports a multi-tenant architecture, allowing integration with multiple tenant environments through a single API connection.
When authenticating against a master account, you can target specific tenant accounts by including the following header in your requests:
This allows a single integration point (e.g., middleware or backend system) to operate across multiple client or sub-account environments without needing to re-authenticate or manage separate connections.
Device Setup
This section explains the steps required to configure Revo XEF devices to work in the test environment.
Step 0: Install Revo XEF TPV APP
Step 1: Access iPad Settings
Open the iPad settings menu to configure the application.
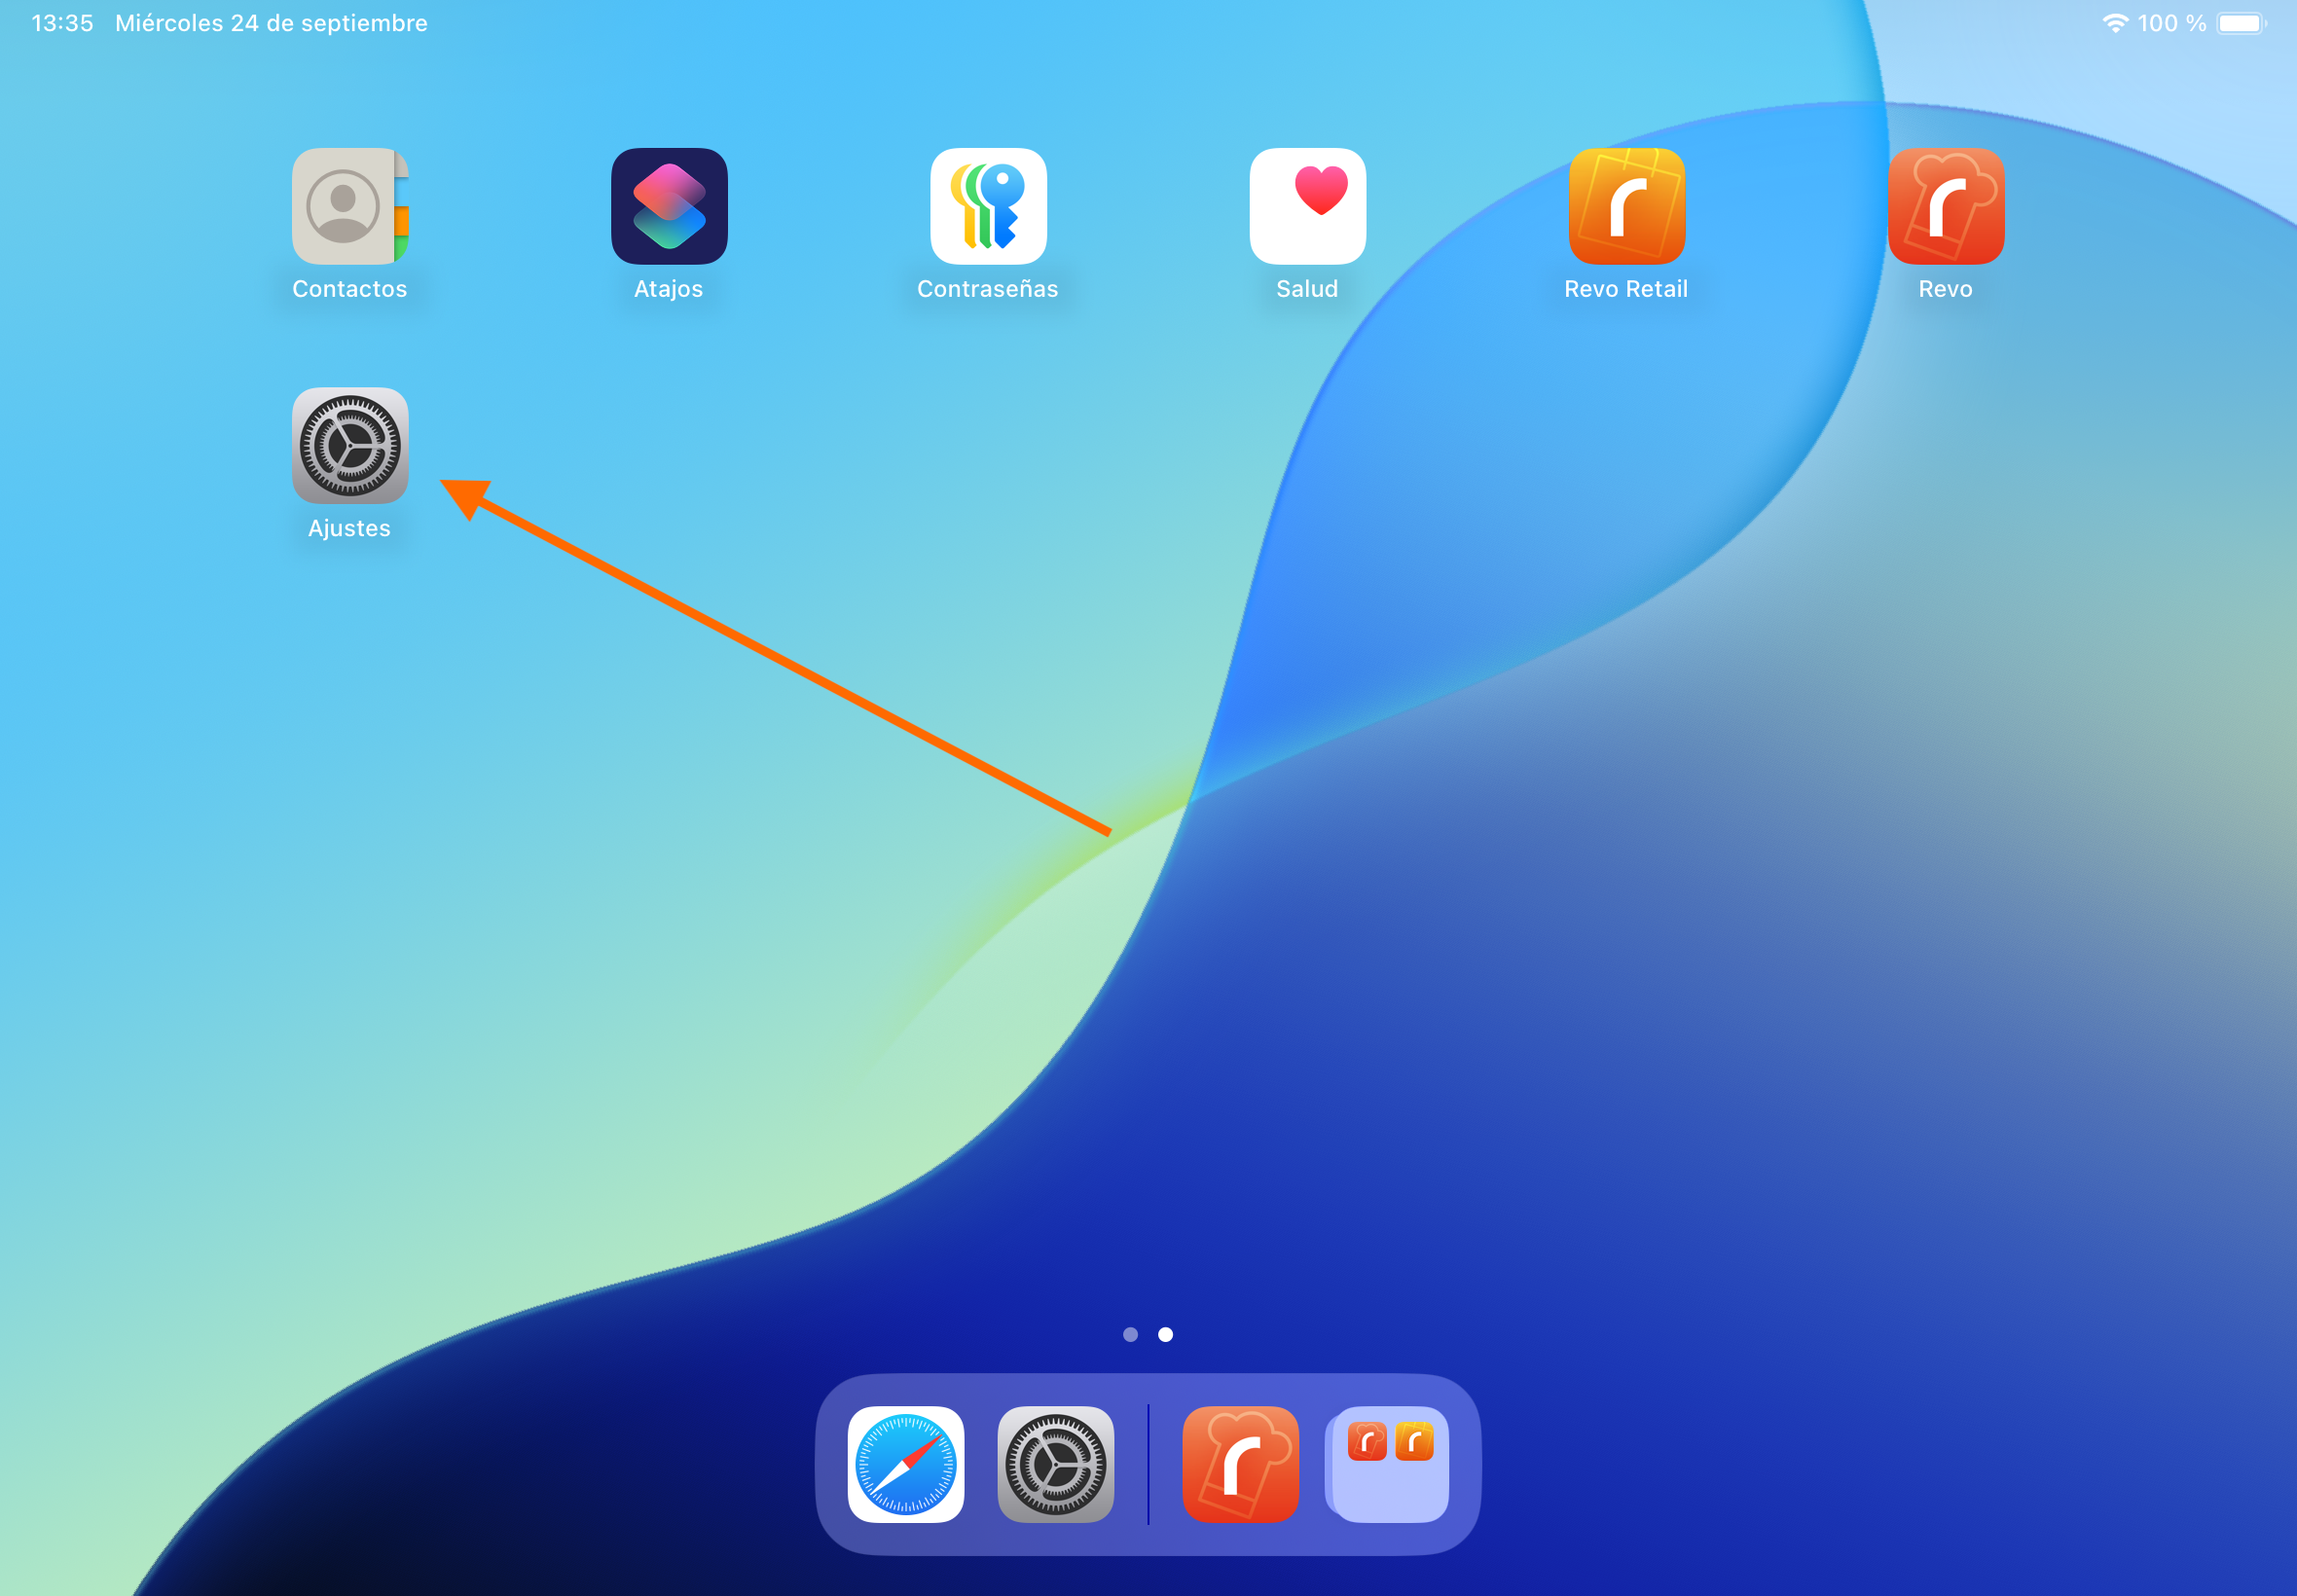
Step 2: Locate the Application
From the left-hand sidebar in Settings, find the specific Revo application you intend to use.

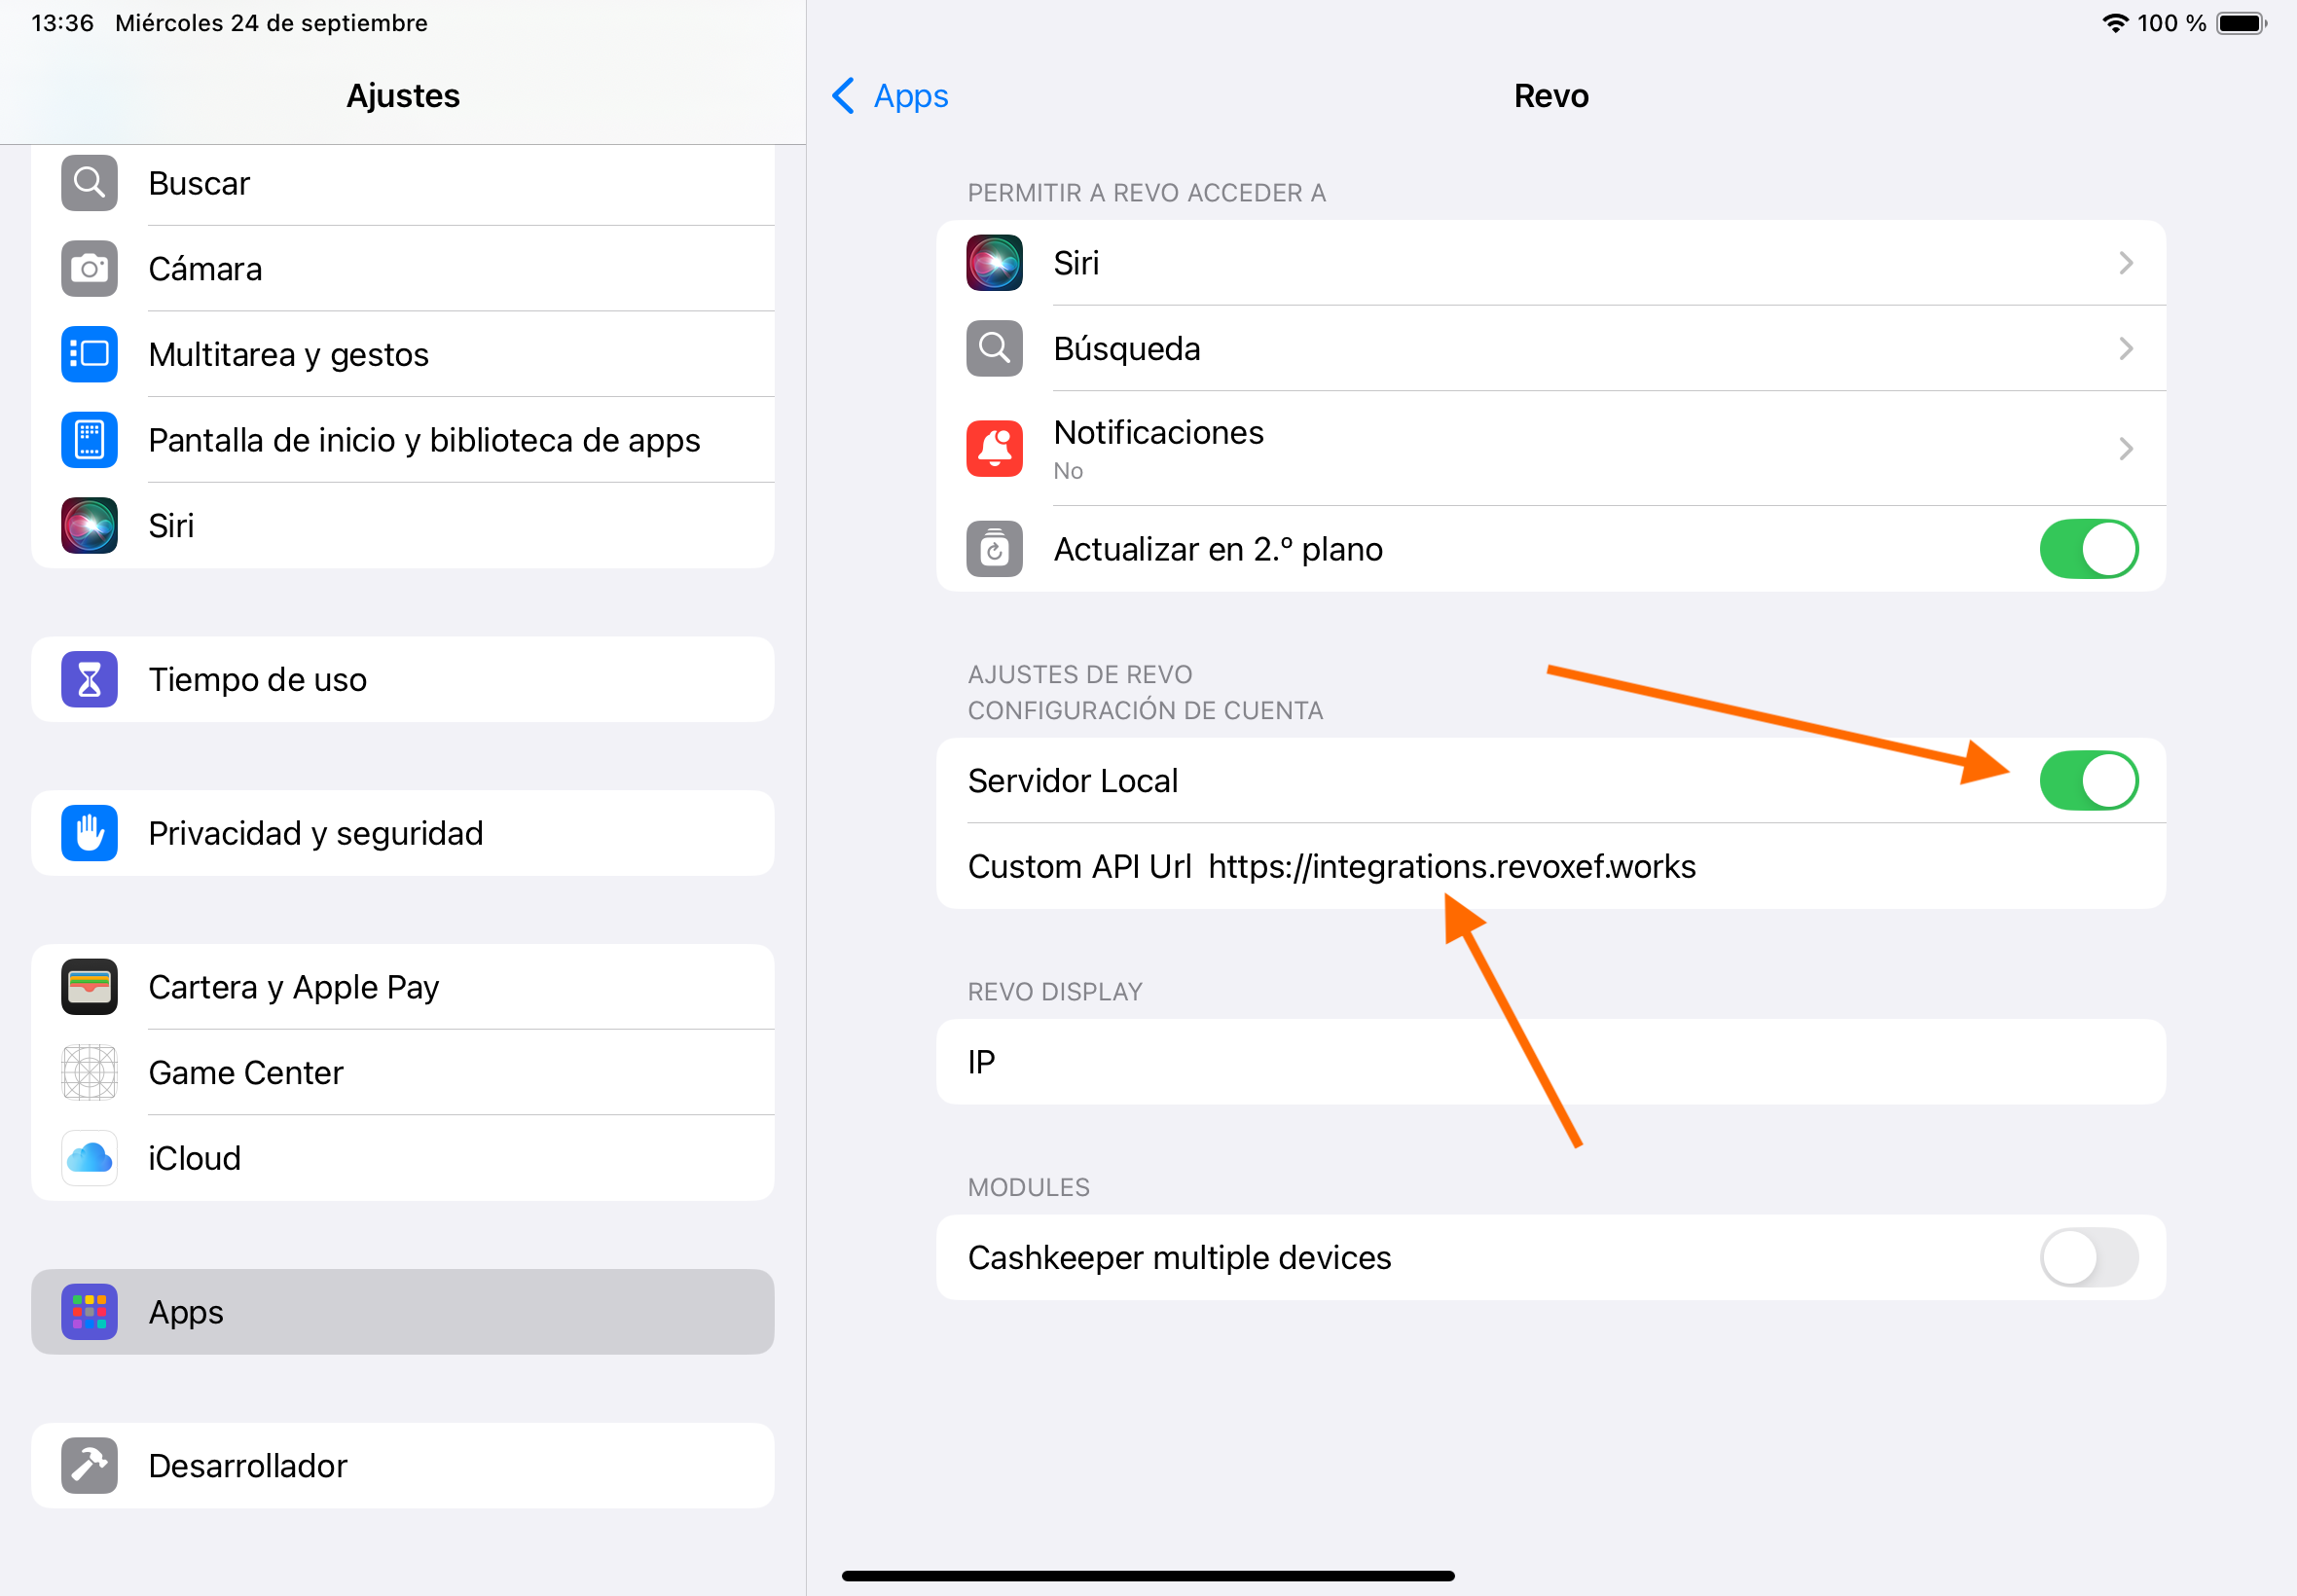
Step 3: Configure Custom URL
Enable the option to use a custom URL, and set it to one of the following integration environments:
Outbound IP List
Here is the list of Revo XEF's outbound IP addresses. These should be whitelisted if your integration restricts incoming traffic.
- 35.233.44.116
- 34.77.21.74
- 34.52.180.126
Certification Process
All integrations must pass a certification process before being deployed to production. Once your integration is certified, you will be issued a new Client ID to access the production environment.
This process ensures your integration is robust, optimized, and follows best practices.
You will need to send us a PDF that includes:
Step 1: Test Account Access (Only for Public Integrations)
You must provide a working account on your platform. This account will be used for testing and for ongoing periodic verification of the integration.
Step 2: Contact Verification
You must define the support escalation process in case a client reports an issue related to the integration.
Step 3: Documentation & Workflow
To better understand your solution, detail the following:
- A brief description of your integration.
- An explanation of how it interacts with Revo.
- A simplified workflow diagram of the integration process.
Step 4: Endpoint Usage
Provide a complete list of API endpoints your integration uses, the order in which they are called, and a short description of what each is used for.
For POST endpoints, you must include a valid example of the request body in JSON format.
Step 5: Final Demo
The PDF detailing the above steps must be sent via email:
Support & Contact
For technical questions related to the API or your test account, please contact:
If an issue is reported by an end-client or concerns a production product:
- Contact the clients official reseller.
- Provide as many details as possible about the issue.
- The distributor will escalate it via the appropriate support channels at Revo.
Use our Support Article Website to know more about our Revo XEF Product.
API Endpoints
Catalog
Provides access to catalog-related resources such as products, modifiers, categories, etc.
Access to the Catalog V1 specification here
Required scopes:
- catalog.view: View your catalog information
- catalog.manage: Fully manage your catalog
Available resources:
Config
Contains endpoints for managing configuration settings, such as dish orders, rates and taxes.
Access to the Config V1 specification here
Required scopes:
- config: Manage your configuration
Available resources:
Multiple Actions: This feature allows performing multiple actions on Integrations resources in a single request. The process runs asynchronously in the background as a job, and its status can be checked later via the View Job endpoint.Integrations
Allows third-party systems to manage and sync integration-related entities like XPress links.
Access to the Integrations V1 specification here
Required scopes:
- integrations.xpress.view: View your XPress integration
- integrations.xpress.manage: Fully manage your XPress integration
Available resources:
Loyalty
Covers loyalty-related operations such as managing customers, addresses, gift cards and transactions.
Access to the Loyalty V1 specification here
Required scopes:
- loyalty.customers.view: View your customers information
- loyalty.customers.manage: Fully manage your customers
- loyalty.giftcards.view: View your gift cards information
- loyalty.giftcards.create: Create new gift cards and view the existing ones
- loyalty.giftcards.spend: Spend your gift cards
- loyalty.giftcards.reload: Reload your gift cards
- loyalty.giftcards.manage: Fully manage your gift cards
Available resources:
Multiple Actions: This feature allows performing multiple actions on Loyalty resources in a single request. The process runs asynchronously in the background as a job, and its status can be checked later via the View Job endpoint.Purchase
Provides functionality for handling purchase orders and suppliers (vendors).
Access to the Purchase V1 specification here
Required scopes:
- purchase.suppliers.view: View your suppliers' information
- purchase.suppliers.manage: Fully manage your suppliers
Available resources:
Multiple Actions: This feature allows performing multiple actions on Purchase resources in a single request. The process runs asynchronously in the background as a job, and its status can be checked later via the View Job endpoint.Staff
Includes endpoints for managing employees, roles and permissions.
Access to the Staff V1 specification here
Required scopes:
- staff.view: View your suppliers' information
- staff.reset: Reset your employees PIN and password
- staff.manage: Fully manage your staff
Available resources:
Multiple Actions: This feature allows performing multiple actions on Staff resources in a single request. The process runs asynchronously in the background as a job, and its status can be checked later via the View Job endpoint.Tools
These endpoints do not require any scopes for authentication. They provide general information and metadata about the API, allowing clients to explore the available resources and their structures without needing special permissions.
Access to the Tools V1 specification here
Classic API
This API is called the "classic" API and serves as an intermediate layer between the new OAuth2.0 API authentication system and the old API endpoints. Therefore, the endpoints have a different path but function the same way as in the old API.
You must use the same base URL as the new API, and all endpoints include the subpath "classic".
This documentation lists the available resources in the classic API, the required scopes, and the new endpoint paths.
For detailed usage and response information for each resource, please refer to the old API documentation here .
Required scopes:
- classic.reports: View your reports (classic)
- classic.catalog.view: View your catalog (classic)
- classic.catalog.manage: Create and delete your catalog data (classic)
- classic.orders.create: Create orders (classic)
- classic.orders.cancel: Cancel orders (classic)
- classic.orders.purchase: View your purchase orders (classic)
- classic.payments.methods: View your payment methods (classic)
- classic.payments.create: Create payments (classic)
- classic.warehouses: View your warehouses (classic)
- classic.employees: View your employees (classic)
- classic.stocks: Manage your stocks (classic)
- classic.tables: Get tables information (classic)
- classic.child.info: Get child accounts information (classic)
BaseURLs:
- INTEGRATIONS: https://api.integrations.revoxef.works
- PRODUCTION: https://api.revoxef.works
Although the usage of the classic API endpoints (request body and response format) remains the same as described in the old API documentation, the endpoint paths are different. Therefore, below you will find a mapping of the old API endpoint paths to their corresponding paths in the classic API.
Reports (orders, invoices, turns, etc.)
Required scopes:
- classic.reports: View your reports (classic)
Old API doc:
Path Mapping:
| Old API Path | Classic API Path |
|---|---|
| OLD_URL/api/external/v3/reports/{reportName} | [GET] URL/classic/reports/v3/{reportName} |
Catalog
Recommended: Use the New API Catalog resource instead.
Required scopes:
- classic.catalog.view: View your catalog (classic)
- classic.catalog.manage: Create and delete your catalog data (classic)
Old API doc:
Path Mapping:
| Old API Path | Classic API Path |
|---|---|
| OLD_URL/api/external/v2/catalog/groups | [GET|POST] URL/classic/catalog/groups |
| OLD_URL/api/external/v2/catalog/categories | [GET|POST] URL/classic/catalog/categories |
| OLD_URL/api/external/v2/catalog/items | [GET|POST] URL/classic/catalog/items |
| OLD_URL/api/external/v2/catalog/sellingFormats | [GET|POST] URL/classic/catalog/selling-formats |
| OLD_URL/api/external/v2/catalog/sellingFormatPivots | [GET|POST] URL/classic/catalog/selling-format-pivots |
| OLD_URL/api/external/v2/catalog/modifiers | [GET|POST] URL/classic/catalog/modifiers |
| OLD_URL/api/external/v2/catalog/modifierPivots | [GET|POST] URL/classic/catalog/modifier-pivots |
| OLD_URL/api/external/v2/catalog/modifierCategories | [GET|POST] URL/classic/catalog/modifier-categories |
| OLD_URL/api/external/v2/catalog/modifierGroups | [GET|POST] URL/classic/catalog/modifier-groups |
| OLD_URL/api/external/v2/catalog/menuMenuCategories | [GET|POST] URL/classic/catalog/menu-menu-categories |
| OLD_URL/api/external/v2/catalog/menuMenuItemCategoryPivots | [GET|POST] URL/classic/catalog/menu-menu-item-category-pivots |
| OLD_URL/api/external/v2/catalog/groups/{group_id} | [GET|DELETE] URL/classic/catalog/groups/{group_id} |
| OLD_URL/api/external/v2/catalog/categories/{category_id} | [GET|DELETE] URL/classic/catalog/categories/{category_id} |
| OLD_URL/api/external/v2/catalog/items/{item_id} | [GET|DELETE] URL/classic/catalog/items/{item_id} |
| OLD_URL/api/external/v2/catalog/sellingFormats/{sellingformat_id} | [GET|DELETE] URL/classic/catalog/selling-formats/{sellingformat_id} |
| OLD_URL/api/external/v2/catalog/sellingFormatPivots/{sellingFormatPivot_id} | [GET|DELETE] URL/classic/catalog/selling-format-pivots/{sellingFormatPivot_id} |
| OLD_URL/api/external/v2/catalog/modifiers/{modifier_id} | [GET|DELETE] URL/classic/catalog/modifiers/{modifier_id} |
| OLD_URL/api/external/v2/catalog/modifierPivots/{modifierPivot_id} | [GET|DELETE] URL/classic/catalog/modifier-pivots/{modifierPivot_id} |
| OLD_URL/api/external/v2/catalog/modifierCategories/{modifierCategory_id} | [GET|DELETE] URL/classic/catalog/modifier-categories/{modifierCategory_id} |
| OLD_URL/api/external/v2/catalog/modifierGroups/{modifierGroup_id} | [GET|DELETE] URL/classic/catalog/modifier-groups/{modifierGroup_id} |
| OLD_URL/api/external/v2/catalog/menuMenuCategories/{menuMenuCategory_id} | [GET|DELETE] URL/classic/catalog/menu-menu-categories/{menuMenuCategory_id} |
| OLD_URL/api/external/v2/catalog/menuMenuItemCategoryPivots/{menuMenuItemCategoryPivot_id} | [GET|DELETE] URL/classic/catalog/menu-menu-item-category-pivots/{menuMenuItemCategoryPivot_id} |
Warehouses
Required scopes:
- classic.warehouses: View your warehouses (classic)
Old API doc:
Path Mapping:
| Old API Path | Classic API Path |
|---|---|
| OLD_URL/api/external/v2/warehouses | [GET] URL/classic/warehouses |
| OLD_URL/api/external/v2/warehouses/{warehouse_id} | [GET] URL/classic/warehouses/{warehouse_id} |
Stocks
Required scopes:
- classic.stocks: Manage your stocks (classic)
Old API doc:
Path Mapping:
| Old API Path | Classic API Path |
|---|---|
| OLD_URL/api/external/v2/warehouses/{warehouse_id}/addStock | [POST] URL/classic/warehouses/{warehouse_id}/add-stock |
| OLD_URL/api/external/v2/warehouses/{warehouse_id}/setStock | [POST] URL/classic/warehouses/{warehouse_id}/set-stock |
Employees
Recommended: Use the New API Staff resource instead.
Required scopes:
- classic.employees: View your employees (classic)
Path Mapping:
| Old API Path | Classic API Path |
|---|---|
| OLD_URL/api/external/v2/employees | [GET] URL/classic/employees |
| OLD_URL/api/external/v2/employees/{employee_id} | [GET] URL/classic/employees/{employee_id} |
Purchase Orders
Recommended: Use the New API Purchase resource instead.
Required scopes:
- classic.orders.purchase: View your purchase orders (classic)
Old API doc:
Path Mapping:
| Old API Path | Classic API Path |
|---|---|
| OLD_URL/api/external/v2/purchaseOrders | [GET] URL/classic/purchase-orders |
| OLD_URL/api/external/v2/purchaseOrders/{purchaseOrder_id} | [GET] URL/classic/purchase-orders/{purchaseOrder_id} |
Payment Methods
Required scopes:
- classic.payments.methods: View your payment methods (classic)
Old API doc:
Path Mapping:
| Old API Path | Classic API Path |
|---|---|
| OLD_URL/api/external/v2/paymentMethods | [GET] URL/classic/payment-methods |
Tables Info
Required scopes:
- classic.tables: Get tables information (classic)
Old API doc:
Path Mapping:
| Old API Path | Classic API Path |
|---|---|
| OLD_URL/api/loyalty/tables/{tableId}/order | [GET] URL/classic/tables/{table_id}/order |
| OLD_URL/api/loyalty/tables/{tableId}/available | [GET] URL/classic/tables/{table_id}/available |
Order Creation
Required scopes:
-
Both needed for the order creation endpoint.
- classic.orders.create: Create orders (classic)
- classic.payments.create: Create payments (classic)
Old API doc:
Path Mapping:
| Old API Path | Classic API Path |
|---|---|
| OLD_URL/api/loyalty/orders | [POST] URL/classic/orders |
Payment Creation
Required scopes:
- classic.payments.create: Create payments (classic)
Old API doc:
Path Mapping:
| Old API Path | Classic API Path |
|---|---|
| OLD_URL/api/loyalty/orders/{orderId}/payments | [POST] URL/classic/orders/{order_id}/payments |
Order Cancellation
Required scopes:
- classic.orders.cancel: Cancel orders (classic)
Old API doc:
Path Mapping:
| Old API Path | Classic API Path |
|---|---|
| OLD_URL/api/loyalty/orders/{orderId} | [DELETE] URL/classic/orders/{order_id} |